Exorcism of the "EVIL" Attenuator
Contributed By John Parker
Email: cpmodem@bigfoot.com
Up until now, the ST1100's headlight output has always been limited
by (in the U.S. anyway) its D.O.T. strangled lens and reflector. I have finally taken a leap of faith and removed
the restriction on the reflector...AKA the Evil Attenuator. Before I begin with the dirty details, let me warn
you that, like a "real" exorcism where an evil spirit is driven from a human host, this exorcism of the
evil attenuator can be dangerous to the headlight of your beloved ST. It can even result in the death of said very,
VERY expensive and vital part of your cycle. This is a mega expensive part that if destroyed will not only curtail
your riding pleasure until you procure a replacement, but will seriously curtail your wallet. I have seen various
quotes of over $800 for the ST's headlight assembly...the entire assembly of which one must purchase even if only
a single part is damaged. Read the full procedure before beginning
the actual work.
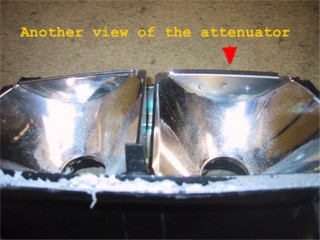 The image on the left
shows the attenuator as it looks with the lens removed. As you can see, it is the non-reflective piece of metal
riveted to the top reflector on the right (left side beam as seen from the seat). Look at the reflection of the
camera's flash in the upper reflector of the left side...now note the lack of reflection from the attenuator. This
is what kills the low beam on the left side of the D.O.T. ST1100 headlight. The removal of this evil plate is the
purpose of this experiment. The result, hopefully, will be the resurrection of the ST's low beam to something akin
to what is available in Europe.
The image on the left
shows the attenuator as it looks with the lens removed. As you can see, it is the non-reflective piece of metal
riveted to the top reflector on the right (left side beam as seen from the seat). Look at the reflection of the
camera's flash in the upper reflector of the left side...now note the lack of reflection from the attenuator. This
is what kills the low beam on the left side of the D.O.T. ST1100 headlight. The removal of this evil plate is the
purpose of this experiment. The result, hopefully, will be the resurrection of the ST's low beam to something akin
to what is available in Europe.
The first step of the exorcism is to remove the headlight assembly from its mount in the front of the ST so that
you can set it on a work bench and begin your vigorous destruction...ahem, I mean modification. Begin by removing
the windshield, windshield garnish, and forward dash panel. Then remove the mirror housings and mirrors from the
upper subframe. Remove the black headlight access panel from directly below the headlight. Next remove the inner
front fairing (that U-shaped piece surrounding the opening to the front of the radiator). Now a decision...The
"factory" method would be to remove both upper fairing pieces. This is a major pain in the ass, as practically
the entire bike must be stripped of plastic down to the frame to remove these parts. So, I have found (after doing
this dozens of times) that the headlight assembly may be removed without removing said upper fairing pieces if
one is careful. Note: It has been brought to my attention by
liSTer Raymond Stevens of Pleasant Hill, CA that this shortcut (or "Houdini Move" ;-} should not be attempted
at ambient air temperatures below 65 degrees Farenheight .
If anyone ever catches me Farkeling at below 65 degrees...slap me ;-} After checking the thermometer, remove the
nut and shouldered bolt 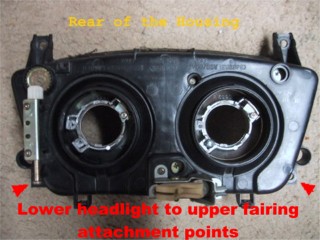 that are
holding the left and right upper fairing pieces together above the headlight. Then remove the 2 Allen head bolts
from their nuts (10 mm) at the top of the headlight assembly. These fasteners are what are securing the headlight
assembly to the two upper fairing pieces. Next, feel up behind the headlight assembly for the 2 -10 mm bolts holding
the bottom of the assembly to the left and right upper fairings. The location of these are identified in the photo
to the right by the two red arrows. Now disconnect the headlamp electrical connectors, if you haven't already,
and slowly but firmly pull the headlight assembly forward off of the two rubber nubs that are securing it to the
subframe. Once free of the frame nubs, rotate the headlight until it will fit out through the opening between the
two upper fairing pieces (where the lens was protruding before dislodging in the previous step). Some reasonable
bending/flexing of the upper fairing pieces will be necessary. Just go slowly and carefully. It will pop out without
forcing anything to the breaking point ;-} Once free of the bike, the dash adjuster cable can be removed by removing
the cable retention screw from the top of the headlight housing. Next, push the headlight vertical adjustment mechanism
in the direction of the cable to provide enough slack to free the cable end from the mechanism. Place the headlight
assembly on the workbench. Now go cool down and relax for a bit...the upcoming procedure is the "exorcism"
proper, and you will want to be fully rested and in a peaceful state of mind before you begin. It is a tedious
and potentially hazardous procedure, to say the least.
that are
holding the left and right upper fairing pieces together above the headlight. Then remove the 2 Allen head bolts
from their nuts (10 mm) at the top of the headlight assembly. These fasteners are what are securing the headlight
assembly to the two upper fairing pieces. Next, feel up behind the headlight assembly for the 2 -10 mm bolts holding
the bottom of the assembly to the left and right upper fairings. The location of these are identified in the photo
to the right by the two red arrows. Now disconnect the headlamp electrical connectors, if you haven't already,
and slowly but firmly pull the headlight assembly forward off of the two rubber nubs that are securing it to the
subframe. Once free of the frame nubs, rotate the headlight until it will fit out through the opening between the
two upper fairing pieces (where the lens was protruding before dislodging in the previous step). Some reasonable
bending/flexing of the upper fairing pieces will be necessary. Just go slowly and carefully. It will pop out without
forcing anything to the breaking point ;-} Once free of the bike, the dash adjuster cable can be removed by removing
the cable retention screw from the top of the headlight housing. Next, push the headlight vertical adjustment mechanism
in the direction of the cable to provide enough slack to free the cable end from the mechanism. Place the headlight
assembly on the workbench. Now go cool down and relax for a bit...the upcoming procedure is the "exorcism"
proper, and you will want to be fully rested and in a peaceful state of mind before you begin. It is a tedious
and potentially hazardous procedure, to say the least.
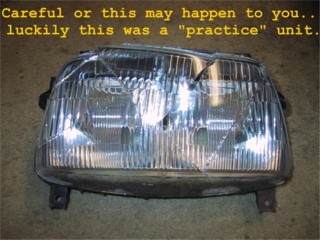 Before you begin this irreversible step in the procedure, look thoughtfully at the photo
to the left. This is what can easily happen to your beloved ST's headlight if you aren't very, VERY careful :-0
Before you begin this irreversible step in the procedure, look thoughtfully at the photo
to the left. This is what can easily happen to your beloved ST's headlight if you aren't very, VERY careful :-0
O.K...I'll begin by telling you (you'll soon see for yourself)
that the lens is secured to the housing at the factory with a very tenacious but flexible sealant. It sticks extremely
tightly to the lens and the housing. First, remove the foam from around the edge where the lens and housing meet
to expose the "work area". Next, remove the four metal retaining clips (two on top and two on the bottom)
and set aside to save for the reassembly. Now, get yourself a thin, but sturdy putty knife for the lens removal.
Then, secure the headlight assembly to the workbench (if you insist on using your lap instead, at least lay a heavy
blanket or moving pad...preferably made of Kevlar, on your lap to protect your valuable body parts from a slip
of the blade :-} The idea here is to run the putty knife around the edge, between the GLASS lens and the plastic
headlight housing, severing the tenacious plastic putty seal. Be
very careful here...it is extremely easy to slip and cut yourself FATALLY. The Femoral Artery is within putty knife
depth in your inner thigh. This is one of the human body's major blood vessels and if it is cut, and if emergency
medical procedures and rapid surgical intervention are not initiated immediately, a full bleed out is imminent
(within a few minutes), and death is the usual result. DO
NOT CUT TOWARD ANY PART OF YOUR BODY AT ANY TIME!!!!!
Scared yet? Well you ought to be....here goes. Run the
putty knife carefully and safely around the edge of the lens to housing seal, cutting the putty sealant. DO NOT
pry against the glass lens...remember the photo above. Have patience, and take all of 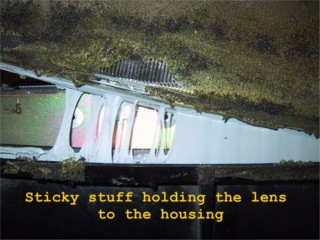 the time necessary to do the job right.
You will only have one chance at this. After the seal has been broken all of the way around the housing to lens
contact area, the lens may be CAREFULLY pried away from the housing with a suitable tool. The operative word here
is carefully, DO NOT force the lens. If it does not start to lift where you can get to the putty with a razor blade,
continue to run the putty knife around the edge until it lifts without undue force. Again, remember the image of
the broken lens...the glass lens will NOT flex, too much pressure in the wrong place can ruin you whole day :-(
the time necessary to do the job right.
You will only have one chance at this. After the seal has been broken all of the way around the housing to lens
contact area, the lens may be CAREFULLY pried away from the housing with a suitable tool. The operative word here
is carefully, DO NOT force the lens. If it does not start to lift where you can get to the putty with a razor blade,
continue to run the putty knife around the edge until it lifts without undue force. Again, remember the image of
the broken lens...the glass lens will NOT flex, too much pressure in the wrong place can ruin you whole day :-(
The image to the right shows what the putty seal looks
like as the lens is lifted. You will have to cut this sticky stuff as you lift the lens. Use a NEW safety razor
blade (single edge). Note behind the putty in the photo the rivets that hold the "evil thing" to the
reflector and alignment frame. Tenaciously work your way around the edge of the lens to housing seal, carefully
cutting away the sealing putty until the lens comes free of the housing. Eventually, if you are careful and patient,
you will prevail, and the lens will come free of the housing. Set the lens aside in a safe place for later use.
Remember how expensive this thing is, and treat it accordingly! Now, using a 1/4 "inch drill bit, drill out
the attenuator rivets from the alignment frame side. You don't need to drill all of the way through the rivets,
just enough to remove the rivets and free the attenuator from the reflector. Be careful nothing drops onto the
reflector itself. It is soft plastic and very easily damaged. Now is a good time to emphasize that you should not
touch or clean the reflectors under any circumstance. No matter how tempting it may be to use a lens cleaner and
polish up that mirror finish, DON'T do it!!! The reflectors are coated with a very, VERY fragile clear coating.
This coating will peel off if exposed to even a mild lens cleaner. If the reflectors are subsequently damaged,
or are already damaged from high wattage bulbs, they can be recoated by several methods. The best way is to send
it to a firm that specializes in re-coating telescope mirrors. They will vacuum apply a super reflective, optically
perfect, apochromatic, mirror coating. Be sure they do plastic surfaces before you send in your reflectors. This
is quite pricey, so check it out before you commit.
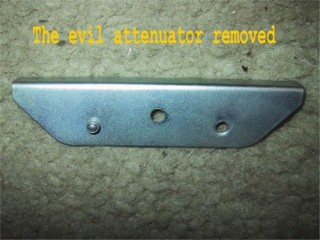 To the left is what the attenuator looks like when it is freed from its reflector host.
Do with it what you like. I have had many suggestions from readers as to where to stick mine...personally, I mounted
mine to the toe of my left riding boot and now revel in the sparks it produces each time I corner at max lean to
the left in the pre-dawn, inky black, center-of-the-Earth, heart of Bin Laden darkness of our Santa Monica mountain
twisties, using the newly released enhanced light of my left low beam reflector to safely light my way ;-}
To the left is what the attenuator looks like when it is freed from its reflector host.
Do with it what you like. I have had many suggestions from readers as to where to stick mine...personally, I mounted
mine to the toe of my left riding boot and now revel in the sparks it produces each time I corner at max lean to
the left in the pre-dawn, inky black, center-of-the-Earth, heart of Bin Laden darkness of our Santa Monica mountain
twisties, using the newly released enhanced light of my left low beam reflector to safely light my way ;-}
Once you have the attenuator out, you will need to re-attach
the reflector to the alignment frame. I used two part epoxy and clamped the parts together while the epoxy dried
overnight.
After the epoxy dries you can clean out the housing channel
the lens rests in. it doesn't have to be completely free of putty; just get the big pieces so that the lens will
insert fully (or as near as possible). Also now is the time to clean the inside of the glass lens itself. After
several years of use there is usually a film buildup that reduces the lumens considerably. A thorough cleaning
with a non-filming cleaner will do wonders for those older ST's quality of illumination. I use alcohol, but any
non-filming cleaner that is safe to use on glass will work. Hold the lens up to the light and make sure you have
gotten all of the flutes and edges.
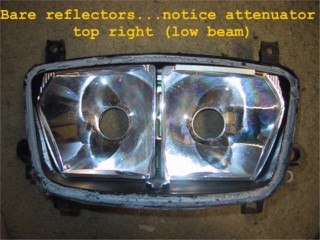 The photo to the right shows the reflectors, in the housing, with the lens removed. Yours
will have the attenuator removed ;-} Using a can of DRY air (available at camera, computer, and electronics stores),
carefully blow the housing and reflectors free of any dust or pieces of sealant that may of settled there. Then
apply a bead of pure silicone sealant (RTV, GE, etc.) to the lens channel in the headlight housing (where the gray
factory stuff was). I use clear RTV, but color doesn't mater here. Carefully, seat the lens edge into the channel
and press firmly. Attach the 4 metal clips in their original locations. These will hold the lens in place until
the silicone sets. Cover the openings with a lint free cloth or plastic sheet, set the assembly in a safe, protected
place to allow the silicone to dry overnight (24 hrs).
The photo to the right shows the reflectors, in the housing, with the lens removed. Yours
will have the attenuator removed ;-} Using a can of DRY air (available at camera, computer, and electronics stores),
carefully blow the housing and reflectors free of any dust or pieces of sealant that may of settled there. Then
apply a bead of pure silicone sealant (RTV, GE, etc.) to the lens channel in the headlight housing (where the gray
factory stuff was). I use clear RTV, but color doesn't mater here. Carefully, seat the lens edge into the channel
and press firmly. Attach the 4 metal clips in their original locations. These will hold the lens in place until
the silicone sets. Cover the openings with a lint free cloth or plastic sheet, set the assembly in a safe, protected
place to allow the silicone to dry overnight (24 hrs).
 When dry, replace
the foam with new stuff or cover with black electrical tape to the original edge of the foam. Reinstall the headlight
assembly into the bike using the reverse order of the removal instructions. Be careful and patient here. Do not
force anything. It will fit...after all, it came out didn't it? ;-} The end result is shown in the image to the
left.
When dry, replace
the foam with new stuff or cover with black electrical tape to the original edge of the foam. Reinstall the headlight
assembly into the bike using the reverse order of the removal instructions. Be careful and patient here. Do not
force anything. It will fit...after all, it came out didn't it? ;-} The end result is shown in the image to the
left.
Now go out and RIDE, and enjoy the visibility with which
the ST headlight should have come from the factory.
...John
Obligatory XXsmall print Disclaimer: The preceding
essay was penned as a totally academic endeavor, and it was never intended someone attempt to duplicate the proceedure.
The evolutions were all performed by trained professionals on a closed course. Do not try this at home. Always
wear your helmet and full safety gear including, but not limited to, OSHA approved eye protection, gloves and adequate
boots. Obey all traffic laws at all times. The author takes no responsibility for any damage to property or person
or any legal hassles that may, and probably will occur if the reader foolishly attempts to undertake the above
farkel (modification).